Crafts with their own hands from pine cones. Unique crafts from cones
Many people like to go to the woods for mushrooms, but some take walks completely behind other things, namely, behind the cones. Why are they needed? Of them you can make a lot of interesting and cute things. Spruce and pine trees are common in our area, the shape of which is associated with the trunk or body parts of people and animals, so they are an excellent material for bulk crafts.
Crafts from pine and spruce cones
Both open and unopened are suitable for work. Between themselves, they can be glued together with white glue or Moment glue. The latter is suitable for children of preschool and school age. Crafts from cones and clay is better to create with 2-3-year-olds. In this case, the missing parts are molded, drawn with felt-tip pens, paints or markers, created from twigs, acorns, leaves, feathers, seashells and other natural materials.
The most unusual crafts can be made from such natural raw materials, which can become both a unique object for interior decoration and an amusing toy, and saved until the New Year holidays, they will be an excellent decoration for the Christmas tree.
When creating products with children, they need to explain one nuance: cones, when dry, tend to open, so the shape of the finished crafts can be broken. Especially strong deformation is observed in spruce.
To avoid this unpleasant phenomenon, you must first immerse the material in wood glue. After that, he will certainly keep the shape and the scales will not flake off. Then it is dried well and then you can start work.
First of all, children will be interested in making various animals, which are excellent crafts for the fall holiday or any other event held in kindergartens and school institutions.
Crafts from cones for kindergarten are not only beautiful and interesting, but also very beneficial. This type of work is excellent for the development of fine hand motor skills and has a beneficial effect on mental development. That is why such studies have found recognition and are widespread in kindergartens and primary schools.
It is recommended to use completely dried cones. They can have a different shape and size, which allows kids to show imagination when creating a variety of objects, animal figures, etc. Small items may be difficult to do, so parents should help especially small children.
Finished products can be coated with acrylic paint, which has been popular lately, with glitter varnish, decorated with beads and beads, colored threads and ribbons, cotton wool, for example, when making a snowman or a Christmas tree.
Crafts from cones for children
As mentioned above, children love to make animals and people. Cones are great for creating bodies, and from acorns or large wooden beads - the head. For example, when creating a skier figurine, which can later be hung on the Christmas tree, you will need ice cream sticks. Of these, the skis themselves are made, and the blue wire is used for pens.
Mom can sew clothes for such a little man from fabric, for example, felt. It is best to bond all the parts together with a glue gun, so the child will need help in this difficult task.
Interesting will be crafts from pine cones and needles. First of all, they make hedgehogs. The job is to put bundles of pine needles under the scales. The latter are glued with clay, and then inserted with the help of a toothpick into the main material.
After that, they need to mow to get a real hedgehog, or leave it as it is, but then you get a porcupine. The muzzle and the ears usually make plasticine, and a black peppercorn pea will serve as a spout. Rowan berries or mushrooms made of acorns and twigs are attached to the back.
Older children can do more complex hedgehog. It will need a lot of fully opened cones, but not spruce, but pine ones, one bowl or a deep plate (an unnecessary, pinned one will fit), three caps from ordinary plastic bottles, a plastic bottle itself, glue (Moment, PVA), paints and scotch .
The plate is turned over and glued to one of the sides of the half of the bottle (with the neck), and then, for reliability, they stick adhesive tape. After that, the bowl and bottle are painted on all sides with brown or black paint. You can use a primer in a can. Cones are glued on the entire surface of the bowl, they do not touch the bottle, as it acts as a muzzle.
From the two remaining caps, make eyes and stick on the bottle. From the plastic strips or other suitable material make the antennae, which are attached by screwing the cap on the neck of the bottle. It is possible to decorate such an animal with berries of mountain ash and viburnum, branches and leaves.
What to consider when working with children
Crafts from the cones with their own hands - an exciting and interesting pastime. Natural materials allow the child to feel the beauty of nature, but also suggest ideas for creating images.
Such activities develop creative imagination in children, for example, in the most common pinecone they can see a mouse or a hedgehog, a Christmas tree, and in some root - a horn of a deer or a leg of a heron.
It is necessary to teach the child to look at any images in natural forms and textures. When parents with a baby, after seeing, for example, a pine cone, decided to make a swan out of it, then the next step would be to glue several parts together. It is important that the child learns to fasten these elements independently.
In this case, he will learn to work with scissors, awl, needle, thread, glue and clay. But the kid does not always have to do such work independently. In some cases, it is better for parents to do it for him, and not because his fingers are not very obedient yet, because he may cut himself or flinch.
Of course, such manipulations in the future can also be trusted to him, but first, as they say, you need to give him the job "shoulder".
Connection of parts together
The fastest and easiest way to fasten parts of crafts from cones is to glue with the help of clay. This method is less aesthetic than the others, but it will be easier for the child to work with it. The material is also used for peepholes, nozzles and beaks, that is, small details that are missing in the intended image.
It is possible to fasten the head with the body with toothpicks, but previously in acorns or other similar material it is necessary to make holes using awl. Then the toothpicks themselves are inserted into these holes and fixed with glue (the usual PVA will do) to make the mount more reliable.
But natural materials have the ability to shrink over time (this has already been mentioned above), so even such a reliable connection can be deformed. With this method, you can fasten crafts for the garden or school, which the child does with his parents.
Used and glue "Moment". To do this, it is spread on the junction and quickly press the parts to each other.
The positive point of using such glue is reliability, besides, the product takes on a more aesthetic look, but it is better not to work with such a tool for small children, for them it is too dangerous.
Similar substances should not be abused, because with prolonged inhalation of vapors side effects will occur.
For the same purpose, use the usual thread with needles. They are perfect for combining soft materials, such as leaves, berries and tree bark.
For small child It will be an impossible task, but the older child with the help of parents will cope with it well. However, such crafts or their parts are less durable, as they shrink quite strongly, significantly decreasing in size.
It would be nice after the forest walk to bring home some fallen cones. Their scales may be open or close to each other. In both cases, it is an excellent material for creativity. Figures of cones made with a child are not only interesting, but also useful. Made creations can be attributed to kindergartenik or arrange a real performance at home, the main participants of which and props will be
Forest beauty from the gifts of the forest - option one
Why not make cones christmas tree? It will not be synthetic, but natural. In addition, it will be possible to save well on this attribute of the holiday and make it unusual and original.
If you will be engaged in creativity with very young children or you have little source material, it means that the first version of the Christmas tree will suit you. For it will need already opened hardened lump.
First make the base for the cones figurines. From thick cardboard cut a circle with a diameter slightly smaller than the circumference of the cone itself. Apply dark paint to it, let it dry. You can glue on the cardboard disc with colored paper.
The child will love the next stage of work. Soften the plasticine, let the kid roll a few balls out of it and attach them between the lumps of the cones. You can make jewelry in another way - roll balls of cotton wool, wrap them in pieces of colored paper or candy wrappers. After that, you need to tightly twist the candy wrapper and glue it with this piece to the cone scale. An adult can do this with a glue gun. In the same way, attach the bottom of the bump to the base of cardboard. A small but beautiful spruce is ready.
Option second manufacturing queen of the forest - the preparation of the base
Thinking what can be made of cones with older children, build a global Christmas facility. Depending on how much natural material brought from the forest, such a height and width will be the tree.
Start with the manufacture of the stand too. Cut a circle from thick cardboard of such a diameter that it fits 5-9 cones (depending on what size the spruce will be).
Christmas tree making
Grease it abundantly with wood glue and lay the cones in a circle with the sharp edge out. If you decide to make a large spruce, pre-fasten the cones together with a rope, twisting them in order. After that, place on a cardboard stand, greased with glue.
In the next row, lay the same amount or one lump less. Spruce will gradually taper upwards. You can reduce the number of cones each row or after two or three. Splash the lower tier with glue, apply the top. When you reach the top of the head, put one unopened cone with a pointed end up, glue it. It is possible to paint such figurines from cones with the help of a can of green, blue, gold or silver colors or leave the products in their original form.
Hedgehog with head and legs
When deciding what can be made from cones, make funny animals with your child. Then they can be put under the newly constructed Christmas tree, come up with a fairy tale and play it with the children.
Make a cone of white plasticine, attach its base to the rounded part of the cone with which it was once attached to a tree. This is the basis of the animal muzzle.
Turn a small piece of black plasticine into a ball, attach it to the nose. From the same material, roll another 2 such circles, flatten them, attach to the place of the eye. Make pupils from white plastic mass or yellow color. From white - 4 small paws and 2 small triangular-shaped ears. Also attach these parts to your place.
Dinosaur and other characters
You can create other charming figures of cones and clay, for example, a dinosaur. To make it colorful, take the material for modeling lilac, red, blue, yellow, green.
Roll a piece of lilac plasticine into a sausage, one side of which is slightly thicker than the second. Attach this wider edge to the narrow part of the open bump. Bend the second end of the sausage slightly, connect it to the red dragon head. Make an incision in the middle of the face, put a small flattened piece of yellow plasticine in its upper and lower parts. This is the mouth of a completely fearless dragon.
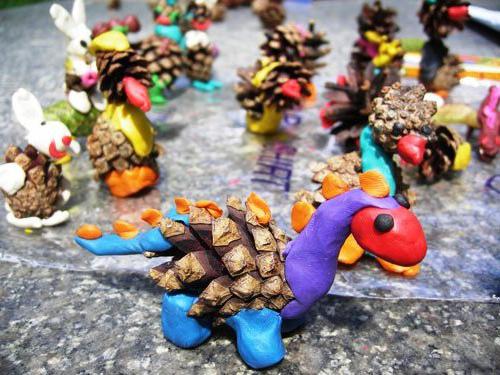
To make the dinosaur even more good-natured, attach to the muzzle of the eyes from plasticine blue. The same shade will be the legs and tail of the fairy-tale character. Turn the pieces of yellow plasticine into triangular ones and attach them to the back, tail and back of the neck.
In the same technique, other figures are made from the cones - animals, people,
Woodman
Walking at the end of summer or early autumn in the forest, you can collect not only fallen cones, but also acorns. This tandem helps to come up with the most interesting ideas for creativity. When deciding which crafts from cones and acorns can be made with children, have the children turn these gifts of nature into a little tree.
Glue the acorn to the crown of the open cone. At the same time, the “cap” of the acorn will become the headgear of the fairy-tale inhabitant of the forest. Turn two small knotty sticks into his hands by attaching them with wire. Cut out the eyes and mouth from colored paper, stick them on the person of the forester.
Dragonflies
Charming will turn out figures of cones and acorns - dragonflies. In addition to these materials, for their design will need an oval-shaped stand. Cut it out of wood, varnish it.
Cones fit more slender, stick them to the stand, it turned out the little body of a dragonfly. Attach 4 oval wings to it. They can be cut from brocade or other thick fabric, attached to the cone with wire or thread. The acorn will turn into an insect's head and cap.
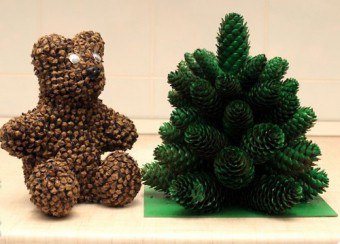
Wreath, Bear

You can make a New Year's wreath to decorate the door. Base it in the form of a ring and make it from wire or wicker, a rod. If you decide to use natural curving materials, take a bunch of rods, tie them with threads in the form of a ring. With the help of wire attach the cones, you can decorate the wreath and other materials, gluing the beads, tying bows. Golden paint will help the composition to gain integrity.
It turns out volumetric, charming and very cute. To create it, it is enough to glue the cones together, giving them the shape of a shaggy forest owner.
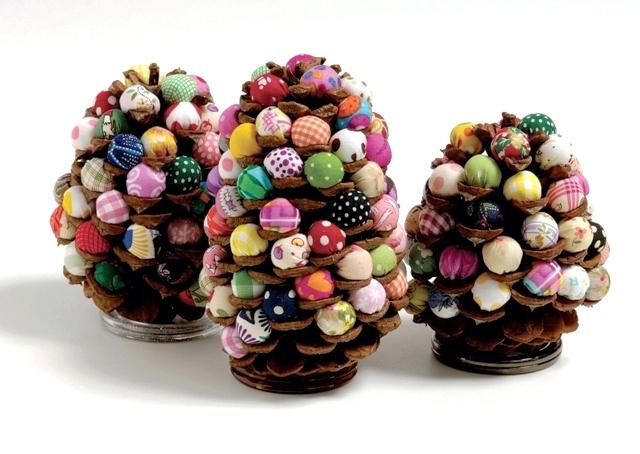
Combination of cloth and forest gifts
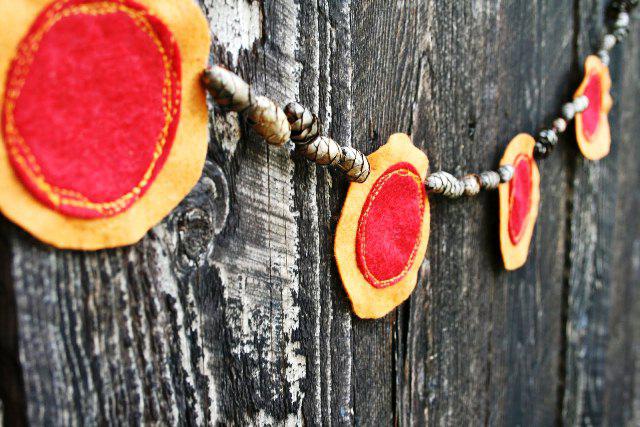
The garland of cones will turn out colorful, original, and it is a pleasure to make it. First, take the felt red and yellow. The rags left over from needlework will do. Cut large circles out of yellow material, and smaller ones out of red. Lay them one on top of another (smaller one on the larger one), attach it as shown in the photo.
Thread a strong thread through the large needle. Pierce 5 cones horizontally with it, then a felt base. Thus fasten the garland to the end. She can decorate a nondescript wall in the country, a tree trunk or decorate the room.
These are the ideas you can make, tips will help awaken the imagination and create many more original things with which to decorate a house, a kindergarten for the holiday.
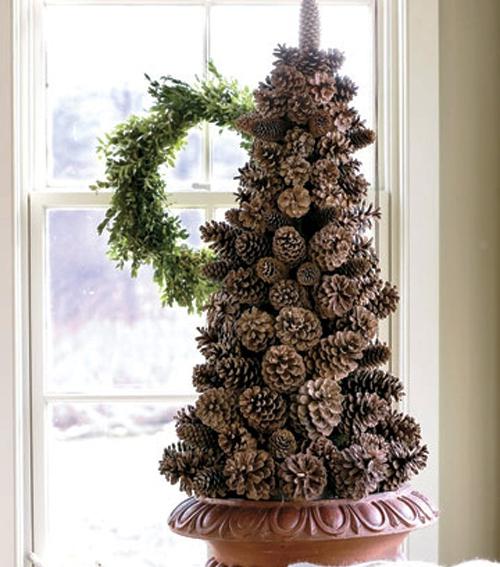
1. To make such a tree from cones, you will need:
- cones;
- Whatman paperboard;
- plaster bandage;
- artificial snow;
- glue at your discretion;
- scraps of multicolored Christmas tinsel.
Decide on the size of the spruce. The height of the spruce and will be the radius. In this case, the height is 32 centimeters. The circumference at the base is about 12 centimeters in diameter. Take a sheet of drawing paper, draw circles of the required radius. Cut out.
Twist the cone sheet so that the base of the cone is approximately 12 cm in diameter. Staple with stapler. From above, where the stapler is missing - use glue or tape. The cone that you succeed in will become the trunk of the future cone tree. Cut off the very tip of the cone on the top of the crown, it is easier then to attach the last bump - the crown.
Take a plaster bandage, cut into pieces. Dampen a piece, slightly squeeze and attach to the trunk of the tree. Smooth out. And so cover the whole trunk. Let it dry. If there is no plaster bandage - use a lot of papier-mâché, too, will come out firmly.
Sort the cones by size. At the base, use bigger cones on the top of smaller sizes. Apply glue to the base of the cone and glue to the trunk of the tree. Hold to glue, or press down with something. The work is not difficult, but it will take a lot of time to stick each cone.
Fill the gaps between the cones and fill them with colored, New Year's tinsel. Apply glue to bumps in places, and not over the entire surface. And quickly sprinkle artificial snow. Instead of artificial snow, sticky spots can also be sprinkled with coarse salt. Allow time for the glue to dry completely. 
Option number 2 - from scales)):
To create such an interior tree of cones you need:
- bumps
- ready foam base conical shape or drawing paper / cardboard
- hot glue gun, scissors
- spray paint
- Christmas decoration (optional)
The first thing you need to collect cones in the nearest park or grove with coniferous trees. Choose larger buds, because in this case you will need their “scales”. At home, if necessary, the bumps need to be dried and cleaned of garbage.
You will need a base for the Christmas tree. The best option would be to use the finished foam blanks, as in this case. But if there is none, then you will have to create it yourself. You can twist the cone from a piece of drawing paper or make it out of papier-mâché. It must be the appropriate height, what you want to create a Christmas tree. In the first case, simply fold the paper sheet and secure it with tape or glue. The bottom should be cut so that the cone stands firmly on a hard surface. You can also glue it with foam rubber or cloth ( dark brown) in order to ensure reliable gluing of scales. 
Take the cones and cut off the “scales” with scissors.
After you cut off enough material, begin to glue the pieces of the cones to the base. Glue to the bottom of the cone, the main element down. 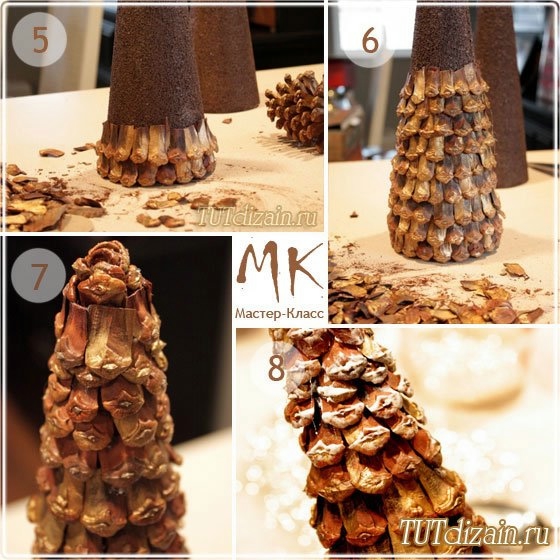
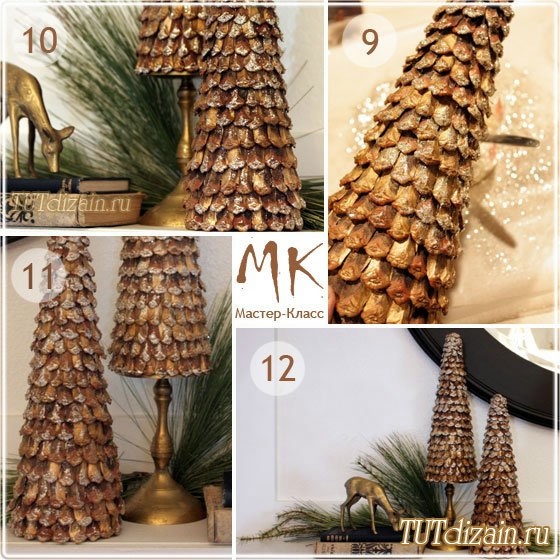
The final touch will be painting the bumps with an aerosol, which is best done in open space (in the courtyard, on the balcony). Drying is also recommended in a well-ventilated area.
Further, at your discretion, you can leave it in this form or decorate it.
Option number 3 - from cones and walnuts:
To create this stylish Christmas tree you will need:
- Foam ready cone with a diameter of about 10-15 cm. You can also make a paper cone;
- bronze powder paint
- liquid paper glue
- hot glue gun
- flower pot
- gypsum
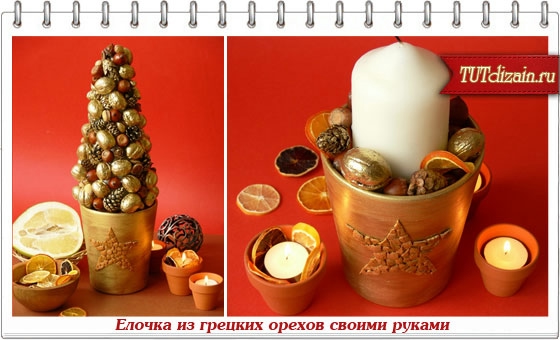
First of all, you need to prepare a “golden” paint, for which purpose pour in a bowl of liquid glue and pour out part of the bronze powder (Fig. 1). Stir.
Slide a nut or cone on a thick needle or a thin needle and use a brush to cover with gold paint (Figure 2). Leave them to dry, sometimes turn over. 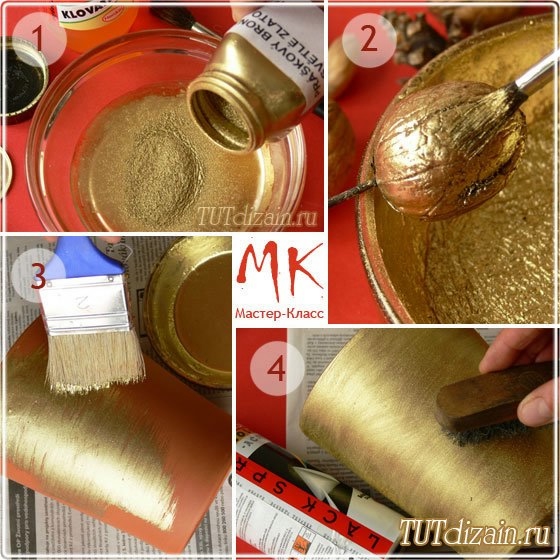
Next, create a decor for the pot. Wet the tip of the wide brush with gold paint and paint the ceramic pot by moving the brush in one direction around the pot. After the first layer dries - apply the second (Figure 3-4).
Stick colored cones and nuts on the cone with a hot gun from the bottom up (Figure 5-6). It is desirable to select the nuts by size and use smaller tops for decoration. Fill the empty spaces between pine cones and nuts with acorns and other decorations. 
Take the finished star pattern and draw its outline on the center of the pot (Fig. 7).
Break the walnut nutshells into small pieces and begin to mosaic them onto the surface of the pot, filling the whole star (Figure 8). 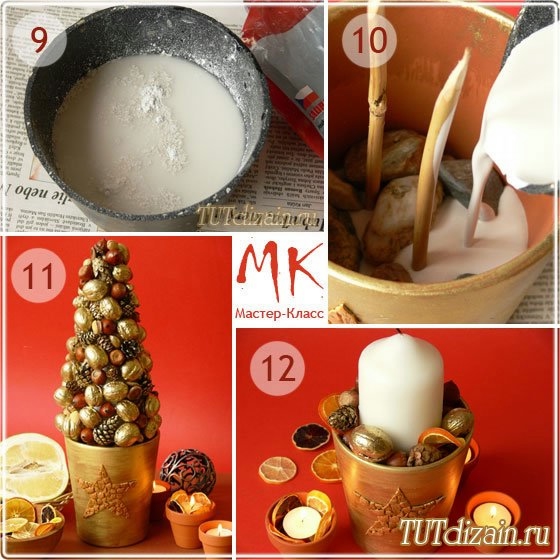
In order for the Christmas tree to stand steadily and not fall - pour the plaster into the pot. To dissolve the plaster mix in a suitable container, follow the instructions on the package.
Leave a small space on top of the pot so that you can fill it with decor (acorns, nuts, etc.)
If you like the idea, but do not have time to implement it, you can create a simpler Christmas composition with candles, as in Figure 12
Option number 4 - Christmas tree-baby): 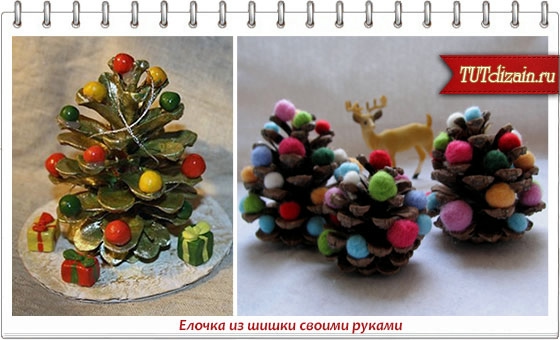
ideal for co-creation with the baby.
For making pine cones you need:
- cones;
- thick cardboard for the stand (you can think of something else);
- heat gun;
- beads, sequins, beads, balls of wool for decor;
- acrylic paint;
- PVA glue + brush (synthetic flat form);
- napkin.
Take a cone and a small piece of cardboard packaging, which will serve as the basis for the Christmas tree. Cut a circle out of cardboard and glue a lump on it with hot glue (photo 1). Apply golden acrylic paint to the surface of the bump (photo 2). 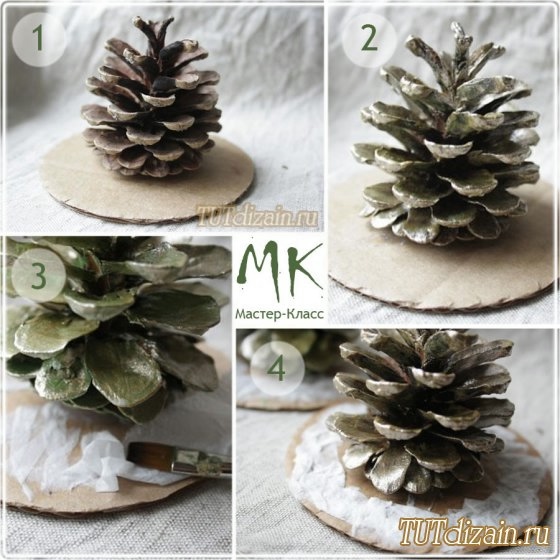
It is possible to glue the pieces of paper to the cardboard, gathering them into folds, thereby giving the cardboard texture, creating a certain snowiness effect (photo 3-4).
Leave the work to dry out, then coat the emulsion / acrylic board. white color (photo 5). Take a little gold acrylic paint on a synthetic flat brush and lightly touch it, tint the cardboard base (photo 6). Then proceed to decorating the pine tree from the cones. Here, decorations in the form of balls and gifts were molded of plastic in advance (photo 7). You can also use a variety of beads, sequins, beads and other shiny and multi-colored decor (photo 8). 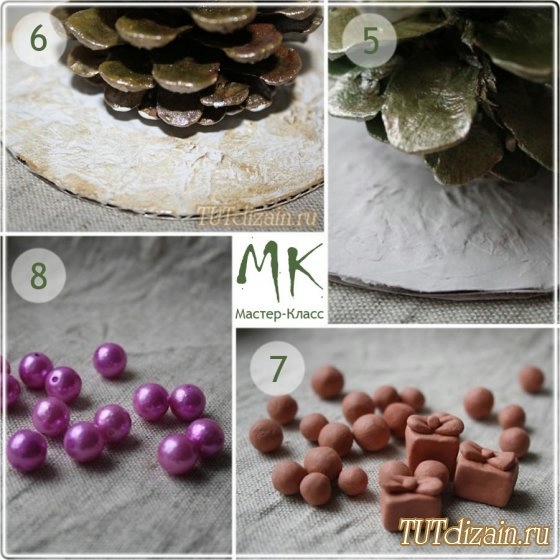
Glue the beads and balls to the bump with a hot glue gun. Gifts need to be painted and also glued to the cardboard. Herringbone cones ready! 


Popular
- What is the name of the Scottish skirt
- What women like a man archer
- Dosage and use of doxycycline when tick bite
- Sinupret - complete instructions
- Number of antennae in arachnid and insect crustaceans
- Help for enterobiasis for the pool, how much is valid
- Ceftriaxone suspension. What is ceftriaxone?
- Third degree breast cancer: prognosis and treatment
- Salt Scrub for the scalp
- Do girls how many centimeters to the uterus