First aid for injuries sprained injury. Basics of medical knowledge. Types of bleeding and their consequences
Download 800+ Abstracts
just 300 rubles. *
* Old price - 500 rubles.
The promotion is valid until December 1, 2017.
Questions of occupation:
1. The concept of a wound
Violation of the integrity of the skin, mucous membranes, deep-lying tissues and surface internal organs as a result of mechanical or other impact, are called wounds, open injuries.
There are superficial and deep wounds. Wounds can also be accompanied by internal bleeding into the abdominal cavity, cranial cavity, etc.
Deep wounds that damage the inner lining of cavities (abdominal, chest, skull, joints) are called penetrating.
Other types of wounds, regardless of their depth, are called non-penetrating. All wounds, except wounds inflicted with a sterile instrument during surgery, should be considered infected.
Classification of wounds. Depending on the type of weapon and on the shape of the wounding object, the wounds can be stabbed, chopped, chopped, bruised, torn, crushed, bitten, poisoned and gunshot.
Stab wounds are applied with a bayonet, knife, awl, nail and other objects. Such a wound is characterized by a small wound hole in the skin, tissue damage, including internal organs, to a considerable depth. Therefore, these injuries require particularly careful examination of the victim to clarify the nature and extent of the injury.
Cut wounds are applied with cold weapons or objects with sharp edges, such as glass, razor blade. These wounds are characterized by smooth edges, which usually gape and bleed heavily. The pain is relatively weak. Sliced wounds heal most quickly.
Chopped wounds are inflicted with an ax, sword, etc. They are similar to incised, but deeper and can be accompanied by damage to the bones and contusion of the surrounding tissues, which reduces their resistance to infection and the ability to heal.
Torn wounds are observed when tissue is damaged by large objects with sharp edges, when the victim gets under the wheels of transport, etc. The ragged wounds have uneven edges, the surrounding tissues are usually heavily damaged, the bleeding is relatively small, pain sensations are expressed.
Bruised wounds are similar to ragged ones. They occur when a strong blow with blunt objects, with collapses, the impact of a shock wave. With extensive tissue damage, lacerated or bruised wounds are called crush.
Torn, bruised and smashed wounds are dangerous by the frequent development of wound infections. In medical practice, these three types of wounds are usually combined into the category of bruised-bruised wounds, and their more detailed characteristic is used in the case of a forensic study.
Bitten wounds are applied with the teeth of animals or humans. The course of these wounds more often than others is complicated by the development acute infectioncoming from oral cavity. Bitten wounds may be infected with the rabies virus.
Poisoned wounds are characterized by the ingress of poison when using poisonous substances, snake bites, scorpions, etc.
Gunshot wounds arise from the action of bullets, shell fragments, shot, shotgun. These wounds can be subdivided into bullet and fragmentation wounds.
Bullet wounds are inflicted by automatic, rifle, pistol bullets; fragmentation arises from the action of shrapnel of artillery shells, mines, hand grenades, aerial bombs, ammunition, a volumetric explosion, etc.
A bullet or a fragment can fall into the bones of the skeleton, crush them into pieces, and the fragments cause additional damage to the soft tissues.
In the presence of the inlet and the outlet wound is called end-to-end. If the injuring projectile gets stuck in the human body, in the tissues, then a blind wound occurs. More often such injuries are found among fragmentation wounds.
A bullet or shard can damage the skin and the underlying tissue without penetrating into its depth. In this case, injuries are called tangents. They usually have no wound channel and are gaping.
If a wounding object penetrates into a body cavity (for example, an abdominal one) during a wound, the wound is called penetrating, when such an object does not penetrate into the body cavity - non-penetrating. Penetrating injuries of the skull, chest and abdomen are usually life threatening.
When a person has several wounds at the same time within the same anatomical region, such injuries are multiple. If several anatomical areas are damaged at once, then the wound is called combined. In field surgery and surgery of injuries, seven areas of the human body are distinguished: head, neck, chest, abdomen, pelvis, spine, limbs. If the victim is injured due to the simultaneous effects of various damaging factors (mechanical, thermal, radiation, chemical) of one or several types of weapons, then the lesion is a combined one.
In modern war, combined lesions will occupy a large proportion in the structure of sanitary losses. It is assumed that radiation injuries will prevail, often burns in combination with mechanical injuries and radiation injuries.
Wounds are dangerous by bleeding, development of a wound infection, damage to vital organs. Wounding has a significant traumatic effect on the body as a whole. In any wound there are dying tissues, blood and lymph circulation. When a wound is healed, the resorption of dead cells, blood, lymph occurs and, as a result of protective reactions, the wound is cleared. The decay products of tissues lead to intoxication and cause a general reaction of the whole organism.
An open fracture occurs when a broken bone causes a fracture in the skin. This is a serious injury and requires prompt first aid. The two main risks from open fractures are infection and bleeding. Broken bones are vulnerable to infection, so if they are exposed to the environment, there is a significant risk of developing bone infection. These infections can lead to loss of life or limbs.
Bleeding is another significant risk, since a broken bone end can act like a serrated knife and damage large ones. blood vessels as it moves. Bleeding can occur under the skin, so it will not be immediately apparent to the first mate.
2. Applying dressings for various injuries.
Fig. 1. Cross-shaped (eight-shaped) bandage
Fig. 2. Stage dressings First aid for open fractureAnother term for open destruction is a complex fracture. This may require pressure around the injury if the bone remains open. If you have access to dressings, place one side of the exposed bone to put pressure on the injury and stop the bleeding. If possible, cover any exposed bone with a sterile dressing to reduce the risk of infection. Any further movement may result in a worsening injury. If you are trained, apply the splint to the injured limb. If you are not trained, you can immobilize your limb with your hands. Support injury from above and below. If they lose a significant amount of blood, then shock can develop. Monitoring the pulse and breathing rate can help you find early signs shock. |
Headbands and neck. For applying bandages on the head and neck, use a bandage 10 cm wide. Victims may need an emergency operation upon arrival at the hospital. Therefore, do not give them anything to eat or drink. Call for emergency medical care. Open fractures require emergency medical care. Do not delay the call for help! When traveling to the desert it is important to have a full first-aid kit and a book. It is also advisable to undergo a first aid course. Good diet, cleanliness and appropriate clothing reduce the risk of unhealthy situations. Diseases, infections, and often insect bites can be avoided by maintaining a proper diet. It is important to bathe daily, but if this is not possible, you must wash your hands often. Soaps can be made using ash and animal fat, or by boiling the inner bark of a pine tree. Build a toothbrush, soaking the end of the green branch. When you go on a trip, do not forget to pack a wide range of clothes and extra shoes. |


The beginning of the second bandage is fixed by one of the circular rounds of the first bandage, then the second bandage moves through the vault of the skull until it crosses the circular band of the first bandage in the forehead area.
After the intersection, the tour of the second bandage through the vault of the skull is returned to the back of the head, covering the previous tour to the left by half the width of the bandage. Cross bandages are performed in the occipital region and the next round of bandages is carried out through the cranial vault to the right of the central tour. The number of returning moves of the bandage on the right and left should be the same. Finish dressing two or three rounds.
Practical testing of standards for the imposition of dressings on various areas of the body using standardized and improvised means to stop bleeding
If an accident happens in the desert, you will be responsible for the situation. The specific sequence of actions in dealing with this situation. Keep calm by giving the patient a calm and effective help first aid. Keep patient warm and lying down. Do not move the victim until you know the extent of the injury. Immediately start mouth-to-mouth resuscitation. 4. 5. Give your patient assurances. Watch for signs 6. Check for cuts, breaks, and injuries to the head, neck, or spine.
Fig. 3. Headband "cap"
Fig. 4.Binding bridle
Fig. 5. Chin-bridle dressing |
Headband "cap". A simple, comfortable dressing, firmly fixes the dressing on the scalp (Fig. 3). Do not allow people to crowd the victim. Do not remove clothes if this is not necessary. 9. Decide whether your patient can be transferred to a proper medical facility. If this is not possible, prepare a suitable living area in which shelter, warmth and food are provided. Bruises and their signsA stroke is the depression of all processes of the body and can follow any injury, no matter how insignificant. Factors such as hemorrhage, cold and pain, increase shock. When experiencing shock, the patient will feel weak and may faint. The skin becomes cold and sticky, and the pulse is weak and fast. Kick may be more serious than injury. |

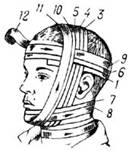
After completing the main rounds of the “bridle” dressing, the bandage is moved around the head and guided along the back of the head of the right side of the neck and made several horizontal circular moves around the chin. Then they move to vertical circular passages that pass through the submandibular and parietal areas. Next, the bandage stroke through the left surface of the neck and the back of the head is returned to the head and circular tours are performed around the head, after which all the bandage tours are repeated in the described sequence.
When applying a “bridle” bandage, the wounded person must keep his mouth slightly open, or a finger is placed under the chin during bandaging so that the bandage does not interfere with opening the mouth and does not squeeze the neck.
Headband on one eye - monocular (Fig. 6). Initially, horizontal anchoring rounds are applied around the head. Then, in the region of the nape, the bandage is led down under the ear and is slanting up the cheek to the injured eye. The third move (fixative) is made around the head. The fourth and subsequent moves alternate in such a way that one move of the bandage goes under the ear to the affected eye, and the next is fixative. Bandaging is completed in circular motions on the head.
The bandage on the right eye is bandaged from left to right, to the left eye - from right to left.
To prevent and control shock, use the following method. This will help blood circulation to the brain, heart, lungs and other large organs. 3. If severe head injuries are present and chest, lift your upper body. If there are injuries of the chest, lift the affected side to assist in the functioning of the intact lung. four.
Keep the patient warm and under cover. If breathing has stopped, start resuscitation in the mouth. To open the duct, lift the neck of the patient and tilt your head back. 2. Lift the neck, press the nostrils to prevent air leakage. 3. Place the mouth completely around the mouth and blow of the victim, watching the expansion of the chest, 4. After removing the mouth, listen to the air, leaving the patient's lungs and watch the chest fall. Check for cramps in the joints if the chest does not rise.
  
Fig. 6. Eye dressings: Features of dressing and means to stop bleeding in winterRepeat these steps about 12 to 15 times per minute. If you are treating a child, cover your mouth and mouth. Use less air and repeat this method 20 to 25 times per minute. To control bleeding, raise the injured area above the heart and apply pressure using either gauze, clean cloth, dried seaweed, or sphagnum mx. Use the pressure at the pulse point between the damaged area and the heart if the bleeding does not stop. If the bleeding still persists, use a harness between the injury and the heart.
Figure 7. Neapolitan bandage on the ear Fig. 8.Nice dressing
Fig. 9. Dressage: |
Bandage on both eyes - binocular (Fig. 6 c). It starts with circular fixing tours around the head, then just as when applying a bandage to the right eye. After that, the bandage is conducted from the top down to the left eye. Then the bandage is sent under left ear and on the occipital region under right ear, on the right cheek on the right eye. Bandage tours are shifted down and toward the center. From the right eye, the bandage stroke returns over the left ear to the occipital region, passes over the right ear to the forehead and again goes to the left eye. The bandage is completed with circular horizontal bandages through the forehead and the back of the head. This method should be used only in extreme situations. After the bleeding is controlled, wash the wounded area with a disinfectant and apply a bandage and a dressing. Fracture is classified as simple or composite. Signs of a fracture include. Fracture reliefPain in the affected area. 2. The area may be deformed or not deformed. 3. The victim can not place weight on the area without experiencing pain. 4. With any movement of the damaged area, the sensation or sound of the grill may be present. If in doubt, refer to injury as a fracture. 2. Separate the sutures above and below the fracture. 3. If the crack can penetrate the skin, it may be necessary to apply a thrust to straighten the deformation. 4. Be sure to lay your tires. 5. Check the tires frequently to ensure that they do not impede circulation. 6 |


Fig. 10. Blades on head:
Fig. 11. Circular bandage on the neck, reinforced by cruciform strokes on the head
Before opening, cover all open wounds with a clean bandage. Dislocation occurs when ligaments are near articular tears, allowing the bone to be moved out of its nest. It is unwise to dislocate if you are not a trained specialist, as permanent damage can occur. A damaged limb should be supported with a sling or other device, and pain should be controlled with aspirin or other suitable medications. Treat the stretch by applying a cold to the area for the first 24 hours, and then when the swelling subsides, allow the stretch to stretch out for one day. Apply heat the next day to help in the healing process. Straightening should be broken and made motionless until the pain completely disappears. Fig. 12. Spiral breast bandage |
Bandages on the chest. The cone-shaped shape of the chest and the change in its volume during breathing often lead to slipping of the dressings. Thoracic bandaging should be performed with wide bandages and apply additional techniques to strengthen the dressings. Concussions or other head injuries are often accompanied by leakage of watery blood from the nose or ears. Other symptoms may include convulsions, pupil immunity or headache and vomiting. Keep the injured side warm, distribute the pain reliever regularly, and allow time for rest and repair. Sprains of muscles and ligamentsHeat is not uncommon when there is not enough water. The treatment includes many residues, liquid and salt pills. Sunstroke is possible when the body is exposed to excessive sun. Treat sunstroke by resting in a cool place and applying and consuming cold liquid. Prevent sunstroke by wearing proper hats. |


Without disturbing the sterility of the inner surface of the pads, unfold the dressing and cover the wound penetrating the pleural cavity with the side of the pads that is not sewn with colored threads. The rubberized outer shell of the bag is unfolded and cotton-gauze pads are covered with the inner surface. The edges of the shell should be in contact with the skin lubricated with boric vaseline. The bandage is fixed with spiral-shaped rounds of the bandage, while the edges of the rubberized shell are pressed tightly against the skin.
In the absence of an individual dressing package, the dressing is applied using small or large sterile dressings. Cotton-gauze pads are placed on the wound and covered with a paper cover of the dressing, after which the dressing material in the wound area is fixed with spiral-shaped bandage tours.
Bandages on the abdomen and pelvis. When applying a bandage on the abdomen or pelvis at the site of injury or accident, gauze bandages 10 cm, 14 cm and 16 cm wide are used for bandaging.
Muscle cramps occur when muscles accumulate excessive acid or salt reaction through perspiration. Treatments include rest, deep breathing and stretching. Immediately restore salt balance. Burns are usually accompanied by shock. Administer the anesthetic immediately, apply Vaseline-coated gauze to the affected area and dressing. The patient should consume more water than usual.
Symptoms of blindness include prickly or burning eyes, excessive tearing, sensitivity to light, headache, halos around the world and temporary loss of vision. Tie up the victim's eyes and use cold compresses and pain relievers to fight the pain. Vision is usually restored after 18 hours without the help of a doctor. Always wear snow glasses or sunglasses in snowy areas to prevent blindness.
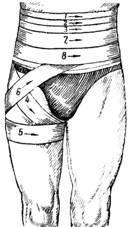 Fig.13. Spiral bandage on the abdomen,
Fig.14.Front tohip bandage: Frostbite occurs when a tissue area, most often the toes of the fingers, fingers, or face, freezes from direct exposure to the elements or strong wind. Frostbite of the first degree turns the area cold, white and numb. When heated, the area becomes red and can be compared with a first-degree burn. After warming when a second degree frostbite occurs, a blister is formed. Dark skin, gangrene and the loss of some kind of skin and tissue are spread to the third degree. Frostbite in the fourth degree causes irreparable damage. The affected area will remain cold and lifeless, and in general, part of the area will be lost. With adequate clothing, frostbite can be easily avoided. Superficial frostbite can be treated by cupping hands and blowing on the affected area, warming with another warm hand or fingers, placing them in the armpits. For more severe cases, you must seek medical assistance.
Fig.15. A general view of the ascending anterior spinal bandage on the hip joint region |
Spiral bandage on the abdomen. In the upper abdomen, reinforcing circular tours are applied in the lower sections of the chest and bandaged into the abdomen with spiral strokes from top to bottom, covering the area of damage. In the lower abdomen, fixation tours are placed in the pelvic region above the pubic joint and spiral tours are conducted from the bottom up (fig. 13). Dislocations and their featuresBlisters are a painful and common result of bad shoes. At the first sign of discomfort, remove shoes and socks and place a piece of adhesive tape over the affected area. If it is absolutely necessary, open the blister, rinse the area thoroughly, and then insert the sterilized needle in the direction of the blister. Apply disinfectant and bandage. Symptoms of sprainsHeadaches are often found in the mountains due to insufficient eye protection, tension in the neck, constipation or "water intoxication", swelling of brain tissue, which occurs when a tourist sweats excessively for several days and consumes a large amount of water without salt. Aspirin can be used to relieve pain, but you need to find the source of the headache to prevent further discomfort. |


Rising anterior spike bandage (Fig. 14 b). It is applied in the reverse order in contrast to the descending bandage. Firming circular tours are superimposed on the upper third of the thigh. Then the bandage is led from the outer lateral surface of the thigh through the groin area to the abdomen, lateral surface of the body and around the body along the front surface of the thigh and transferred to its inner surface. Next, the moves of the bandage are repeated, with each subsequent round shifting up from the previous one. General view of the anterior ascending spike dressing is shown in Fig.15.
Side spike bandage. It is superimposed similarly to the front, however, the intersection of the bandage moves is performed along the lateral surface of the hip joint.
 Fig. 16. Bilateral spike dressing
Figure 1.7. Crotch band dressing
Fig.18.T-shaped bandage on the crotch
|
Back spike bandage.Bandaging begins with firming circular tours around the abdomen. Next, the bandage through the buttock of the sore side leads to the inner surface of the thigh, bypasses it in front and obliquely lifts up again on the body, crossing the previous course of the bandage on the back surface. |
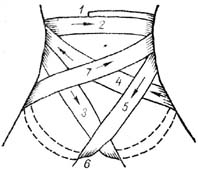


Cravat bandage on both buttocks and perineuml (Fig. 20). The kerchief is laid so that the base runs along the waist. The ends of the scarf are tied to the front on the stomach, and the top is held, covering the buttocks, through the crotch anteriorly and strengthened to the knot from the ends of the scarf. Similarly, but in front, a scarf bandage is applied, covering the front part of the perineum and external genitals.
 Fig. 20.Carry bandage on the crotch and both buttocks |
Fig. 21. Tying on scrotum |

Scrotum dressing (Fig. 21). Suspension belt is held around the waist and fixed with a buckle or knot. The scrotum is placed in the suspension pouch, the penis is discharged through a special opening in the supporting pouch. Two ribbons attached to the bottom edge of the bag are passed through the crotch and are attached to the back of the belt.
Bandages on the upper limb. Recurring finger bandage. Apply with injuries and diseases of the finger, when it is necessary to close the end of the finger (Fig. 22). Bandage width - 5 cm.
Fig. 22. Retractable finger bandage Fig.24.Spiral bandage |
Fig.23.Spiral binding Fig. 25.The bandage on the thumb |
Bandaging starts on the palm surface from the base of the finger, bends around the end of the finger and back side lead the bandage to the base of the finger. After the bend, the bandage is creeping to the end of the finger and spiraling is bandaged towards its base, where it is fastened. |
After securing the passages over the wrist, the bandage is led along the rear of the hand to the tip of the finger, twisted around it, and along the back surface again lead to the forearm.
Such moves reach the base of the finger and the end of the bandage is fixed on the wrist. For the closure of the entire thumb bandage complement the returning tours.
Fig. 26. Cross-shaped (eight-shaped) hand band |
Fig. 27.Retulant hand bandage |
Cross-shaped bandage on the brush (Fig. 26). Closes the back and palm surfaces of the hand, except for the fingers, fixes the wrist joint, limiting the range of movements. The width of the bandage is 10 cm. |
Fig.28.Brass dressing for a brush
Fig.29. Spiral ascending bandage with bends on the forearm (the technique of performing band bends)
|
||


upper third of forearm. To perform the bend, the lower edge of the bandage is held with the first finger of your left hand, and with your right hand you make a bend towards yourself by 180 degrees.
 Fig. 31. Expendable turtle bandage on the elbow joint Fig. 32.Nice bandage on the elbow joint area
Fig.33. Spiral bandage on the shoulder Fig. 34.Kosyachnaya bandage on the shoulder |
The top edge of the bandage becomes the bottom, the bottom - the top. In the next round, the bend of the bandage is repeated. The bandage is fixed with circular rounds of the bandage in the upper third of the forearm. |

To prevent the bandage from slipping, the head of the headscarf is fixed with a loop of a cord, bandage, or a second headscarf, held through the opposite axilla.

Fig. 35.The bandage dressing
Fig. 36. Spike dressing
Fig.37.Nice dressing |
Spike bandage on the shoulder joint area. Used to hold the dressing on wounds in the shoulder joint and adjacent areas. The cross of the bandage tours is performed directly above the dressing material covering the wound. |


The width of the bandage - 10-14cm. The bandage is started with two circular rounds in the lower third of the shoulder, then several strokes are made of the ascending spike-shaped bandage and an additional slanting motion is performed on the back through the shoulder girdle of the healthy side and chest into the damaged axillary region. Then make a circular course, covering the chest and holding a layer of cotton. Additional oblique and circular moves of the bandage alternate several times. Bandaging is completed with spike-shaped dressings and circular rounds on the rib cage.
Crimp bandage on the shoulder joint area (fig.37). A medical headscarf is folded in a tie and the middle of it is placed in the axillary fossa, the ends of the dressing are crossed over the shoulder joint, carried out on the front and rear surfaces of the chest and are tied in the axillary region of the healthy side.
 Fig.38.Nice dressing
Fig.39.Deso dressing |
Platform for hanging the upper limb (fig. 38). It is used to maintain the damaged upper limb after applying a soft bandage or a bandage of transport immobilization. |

In the axillary fossa of the damaged side, before the start of bandaging, put a roller of compressed non-absorbent gray cotton wool wrapped in a piece of wide bandage or gauze. The cushion is inserted to eliminate the displacement of the clavicle fragments in length. The injured arm is bent at the elbow joint at a right angle, pressed against the body and the shoulder is tied to the chest with circular tours (1), which are placed below the level of the roller located in the axillary region on the side of the injury. Next, from the axillary region, the healthy side of the bandage is led slantwise up the front surface of the chest to the upper arm of the injured side (2), where the bandage tour must pass through the central clavicle fragment closer to the side of the neck. Then the stroke of the bandage lead down along the back surface of the shoulder under the middle third of the forearm. Covering the forearm, the bandage is continued along the chest to the axillary region of the healthy side (3) and obliquely upward to the upper side of the injured side, where the bandage tour is again carried out through the central clavicle fragment closer to the lateral surface of the neck, after which the bandage is led down the front surface shoulder under the elbow (4). From under the elbow, the bandage leads in an oblique direction through the back to the axillary region of the intact side. The described moves of the bandage are repeated several times, forming a bandage ensuring reliable immobilization of the upper limb. The bandage is fixed with circular passages over the shoulder and chest.
Bandages on the lower limb. Returning bandage on the toes. Apply with diseases and injuries of the toes. The width of the bandage is 3-5 cm.
The dressing is usually used to hold the dressing on the wounds of 1 toe and rarely to close other fingers, which usually bandage along with the entire foot.
The bandage starts from the plantar surface of the base of the finger, close the tip of the finger and lead the bandage along its back surface to the base. Make the bend and creeping withdraw bandage to the tip of the finger. Then spiral tours bandage it to the base, where the bandage is fixed.
Figure 40. Spiral bandage on the big toe |
Fig.41.The bandage on the big toe |
Spiral bandage on the first toe (fig. 40). The width of the bandage is 3-5 cm. Usually, only one thumb is usually bandaged. Bandaging is recommended to start by strengthening the circular tours in the lower third of the leg over the ankles. Then, through the back surface of the foot, the bandage is led to the nail phalanx of 1 finger. From here, spiral tours cover the entire finger to the base and again through the rear of the foot they return the bandage to the shin, where the bandage is completed with fixing circular tours. |
Fig. 42.Returning bandage |
||

Each subsequent round of the bandage on the first finger is shifted upwards relative to the previous one, thus forming an ascending spica bandage.
Retractable bandage on peripheral parts of the foot. Apply with diseases and injuries of the peripheral parts of the foot and toes. The width of the bandage is 10 cm.
Each finger is covered with a dressing material separately, or all fingers, along with gauze pads between them. Then proceed to the bandaging of the foot. Circular strengthening tours impose in the middle sections of the foot. After that, longitudinal returning tours from the plantar surface of the foot through the tips of the fingers to the dorsum and back, cover the foot across the entire width. With a creeping stroke, the bandage is led to the tips of the fingers, from where the spiral tours bandage the foot to the middle. The bandage on the foot is usually poorly held, therefore it is recommended to finish the bandage with strengthening eight-shaped tours around the ankle joint with fixing circular tours over the ankles.
Full leg bandage (Fig. 42). It is used for damage to the foot, when you want to close the entire foot, including the fingers. The width of the bandage is 10 cm.
Bandaging begins with circular fixing tours in the lower third of the leg over the ankles. Then the bandage move is transferred to the foot, from the side of the inner ankle on the right foot and from the side of the outer ankle on the left, and impose several roundabouts along the side surface of the foot to the first toe, from it back on the opposite side surface of the foot to the heel. From the heel creeping lead bandage to the tips of the fingers and bandage the foot with spiral moves in the direction of the lower third of the leg. In the area of the ankle joint, a technique of applying a bandage on the heel area is used (Fig. 44). Finish the bandage in circular tours over the ankles.
Fig. 43. Cross-shaped (eight-shaped) foot bandage
Fig.44.Binding on the heel area Fig.45 . Spike bandage on foot |
Cross-shaped (eight-shaped) foot bandage (Fig. 43). Allows you to securely fix the ankle with damaged ligaments and some diseases of the joint. The width of the bandage is 10 cm. |

Spiked Ascending Foot Bandage (Fig. 45). It is used to securely hold the dressing material on the back and plantar surface in case of injuries and diseases of the foot. The toes of the foot remain unclosed. The width of the bandage is 10 cm.
Bandaging begins with circular fixing tours through the most prominent part of the heel and the back surface of the ankle joint. Then, from the heel, the bandage moves along the outer surface on the right foot (on the left foot — on the inner surface), obliquely along the back surface to the base of the first finger (on the left foot — to the base of the fifth finger). Make a complete circular motion around the foot and return the bandage to the dorsum at the base of the fifth finger (on the left foot - at the base of the first finger). Over the rear foot intersect the previous round and returned to the heel area from the opposite side. Passing around the heel from behind, they repeat the described eight-shaped rounds of the bandage, gradually shifting them towards the ankle joint. The dressing is completed in circular tours in the lower third of the leg over the ankles.
Kanova bandages on the foot. There are bandages covering the entire foot, the heel area and the ankle joint.
 |
Cravat on the whole foot (rice 46 a, b). The plantar region is closed with the middle of the kerchief, the top of the kerchief is wrapped, covering the fingers and the rear of the foot. The ends are slung over the back of the foot, crossed, and then twisted around the lower leg over the ankles and knotted on the front surface. |
Converging turtle dressing on the knee area (fig. 49 a, b). Bandaging begins with round-up fixing rounds in the lower third of the thigh above the knee joint or in the upper third of the lower leg below the knee joint, depending on where the wound or other injury is located. Then impose converging eight-shaped bandage tours, intersecting in the popliteal region. The bandage is completed in circular tours in the upper third of the leg below the knee joint.
Diversion turtle dressing on the knee area (fig. 49 c). Bandaging begins by fixing circular tours through the most prominent part of the patella. Then perform eight-shaped diverging moves, intersecting in the popliteal region. The dressing is completed with circular rounds in the upper third of the leg or the lower third of the thigh, depending on where the injury is located.
If necessary, apply a bandage on the lower limb in the unfolded position, apply the spiral bandaging technique with kinks. The dressing starts with circular moves in the upper third of the leg and ends with fixing tours in the lower third of the thigh.
Spiral bandage with kinks on the thigh. It is used to hold the dressing on wounds and other injuries of the thigh, which, like the lower leg, has a conical shape. The width of the bandage is 10-14 cm.
Bandaging begins with anchoring rounds in the lower third of the thigh above the knee joint. Then the spiral moves of the bandage with kinks cover the entire surface of the thigh from the bottom up.
As a rule, such bandages on the thigh are held poorly, they slide off easily. Therefore, it is recommended to complete the dressing with a spike-shaped dressing rounds on the hip area.
Bandages on the stump of the limbs. They are superimposed on tearing off various parts of the upper and lower extremities, diseases and injuries of the stumps of the shoulder and forearm, thigh and tibia. When bandaging the limb stump is used the technique of returning bandages. The stumps of the extremities usually have a cone-shaped shape, therefore bandages are poorly retained and require additional reinforcement. The width of the bandage is 10-14 cm.
Retraction Technique (fig. 50).
Bandaging begins with round-up fixing rounds in the upper third of the affected limb segment. Then hold the bandage with the first finger of your left hand and make a bend on the front surface of the stump. The course of the bandage is conducted in the longitudinal direction through the end part of the stump to the back surface. Each longitudinal course of the bandage is fixed in a circular way. Perform the bend of the bandage on the back surface of the stump closer to the end part and move the bandage back to the front surface. Each returning tour is fixed with spiral bandages from the end of the stump.
If the stump has a pronounced conical shape, then the bandage is more durable when the second returning run of the bandage runs perpendicular to the first and crosses at the end of the stump with the first returning tour at a right angle. The third return stroke should be made between the first and the second.
The returning moves of the bandage are repeated until the stump is securely bandaged.
Recurring bandage on forearm stump (pic.51). The bandage begins in circular tours in the lower third of the shoulder, to prevent the bandage from slipping. Then the course of the bandage lead to the stump of the forearm and impose a returning bandage. The bandaging is completed with circular rounds in the lower third of the shoulder.
 Fig.52. Recurring bandage on shoulder stump
Fig.53. Cravat on thigh stump |
Recurring bandage on shoulder stump (fig. 52). The bandage begins in circular tours in the upper third of the shoulder stump. Then they apply a returning bandage, which, before completion, is strengthened with the spikes of the spike bandage on the shoulder joint. Rounding out the bandage in circular tours in the upper third of the shoulder. |

3. Types of bleeding and their consequences
Bleeding can be arterial, venous, capillary and parenchymal.
In the case of arterial bleeding, the blood is a bright red (scarlet) color, beats from the damaged vessel with a discontinuous stream. Such bleeding is a great danger due to rapid blood loss.
When venous bleeding is dark red, it flows in a continuous stream.
In the case of capillary bleeding, blood oozes from the wound.
Parenchymal bleeding occurs when damage to internal organs (liver, kidney, etc.).
Bleeding that occurs from an open wound is called external. Bleeding, in which blood flows from a vessel into the tissues and body cavities (chest, abdominal, etc.), is called internal.
It is accepted to distinguish primary and secondary bleeding. Primary occurs immediately after injury. Secondary bleeding begins after a certain time after it, due to the ejection of a blood clot that has occluded the vessel, or as a result of wounding the vessel with sharp bone fragments or foreign bodies. The cause of secondary bleeding can be careless first aid, poor immobilization of the limb, shaking of the victim during transportation, development of suppuration in the wound.
The danger of bleeding for the health and life of a person is determined by the amount of blood that has poured out, the speed of bleeding, the age of the victim, the nature of the associated lesions, etc. For an adult, blood loss of 1.5-2 liters is life-threatening. Bleeding is the main cause of death on the battlefield, and therefore the main first aid measure for the wounded is a temporary stop of bleeding.
In acute blood loss, there is a darkening in the eyes, shortness of breath, dizziness, tinnitus, thirst, nausea (sometimes vomiting), blanching of the skin, especially of the extremities, and lips. Pulse frequent, weak or almost non palpable, cold extremities. Sometimes fainting is observed.
In case of lung damage, gastrointestinal tract or urinary organs blood can be respectively in sputum, vomit, feces and urine.
Most blood loss leads to loss of consciousness. Blood loss, as already noted, is the main cause of death on the battlefield.
In case of acute blood loss after stopping the bleeding, a large amount of fluid should be introduced into the body to fill the lack of circulating blood. Wounded give drink strong tea, coffee, water. It should be remembered that when injured internal organs of the abdomen to drink the victim should not be given.
In order to improve the blood supply to the brain and other vital organs, it is necessary to raise the victim's legs. Wounded should be warmed.
Blood loss is replenished by transfusion of blood, blood plasma, blood-substituting liquids to the wounded. They are shown giving oxygen.
In the case of injuries to the capillaries, venous vessels and small arteries, the bleeding may stop spontaneously as a result of a blockage of the vessel with a blood clot.
4. Ways to temporarily stop bleeding
A temporary stop of bleeding is achieved by applying a pressure bandage, tourniquet or twist (Fig. 54), by pressing the artery against the bone over.
 but |
|
|
Fig. 54. Ways to temporarily stop bleeding: |
||

The final stop of bleeding is performed when the surgeon processes the wounds in the dressing room and operating room.
In case of any bleeding, especially if the extremity is damaged, the damaged area should be given a raised position and ensure rest. This contributes to lowering blood pressure in blood vessels, reducing blood flow in them and the formation of a blood clot.
Bleeding from minor wounds and capillary can be stopped by the imposition of a pressure sterile dressing. In order to better compress the vessels, a cotton-gauze pad PPI or a sterile bandage is applied to the bleeding wound in the form of a tampon. For a temporary stop of bleeding on the body, only this method is suitable, as others are unacceptable.
Pressing the artery over, i.e., through the bloodstream closer to the heart, is a simple and affordable way to temporarily stop arterial bleeding in different settings. To do this, the vessel is pressed in a place where one or another artery is not very deep and can be pressed against the bone. At these points, you can determine the pulsation of the arteries when palpating with fingers (Fig. 55).
When bleeding in the face and scalp you need to press the submandibular and temporal arteries.
In case of bleeding in the neck, the carotid artery is pressed against the spine at the inner edge of the sternocleidomastoid muscle.
Neck bandage it is applied in such a way that blood circulation is maintained from the intact side (fig. 56).
Bleeding at the base of the upper limb stops by pressing the subclavian artery in the supraclavicular region (Fig. 57). The brachial artery is pressed against the bone of the shoulder along the edge of the biceps muscle (Fig. 58).
Bleeding in the area of the forearm and hand can be stopped when the roller is inserted into the elbow bend and the arm is maximally flexed at the elbow joint.
The arteries of the leg are pressed in the popliteal fossa, having previously placed a soft roller in it and, as much as possible, bending the leg into knee joint.
In case of arterial bleeding in the area lower limb they press the femoral artery in the groin or at the inner edge of the quadriceps muscle (Fig.59).
In order to successfully stop bleeding, the arterial vessel must be squeezed by the pulp of two to four fingers. This method of stopping bleeding is used as a short-term measure. It must be supplemented with a fast overlay harness.
Plait overlap is the main way to temporarily stop bleeding on the battlefield when the large arterial vessels of the limb are injured. For this rubber band is used. It consists of a rubber band with a length of 1–1.5 m, with a metal chain attached to one end and a hook to the other.
Fig. 58. The pressing of the brachial artery. |
Fig. 59. Femoral artery pressing |
Fig. 60. The method of overlay harness
Fig.61. The method of blending twist |
Before laying, the tourniquet is stretched, then it is wrapped with it 2-3 times around the limb so that the coils lie side by side. The ends of the harness are fastened with a chain and a hook or knotted (fig.60). |


To do this, press the artery with your fingers above the place where the tourniquet is applied, slowly, so that the blood flow does not push the resulting blood clot, the tourniquet dissolves for 5–10 minutes and again tightens it. Temporary loosening of the harness in this way is repeated every hour until the victim receives surgical assistance. The wounded with a tourniquet must be monitored, since the tourniquet may weaken, leading to renewed bleeding.
In the absence of a harness, you can use the available materials a rope, a belt, a twisted handkerchief, etc., to temporarily stop the bleeding.
With improvised means, a limb is pulled over just like a rubber cord, or a twist is made, the end of which is pinned to a limb (fig. 61).
5. Features of dressing and means to stop bleeding in winter
Temporary loosening of the harness in winter is repeated every 30 minutes until the victim receives surgical assistance.
Dressings in winter should be applied without visible signs of squeezing. The compression of the dressing is manifested by the blueness of the skin and swelling of the limb below the dressing, painful sensations, throbbing pain in a wound, numbness, tingling, increased bleeding from a wound (venous tourniquet phenomenon). When transporting in winter, impaired blood circulation as a result of compression by a bandage can lead to frostbite of the peripheral parts of the limb.
6. Practical testing of standards for the imposition of dressings on various areas of the body using standardized and improvised means to stop bleeding
Standard number 2 - Primary dressing
INITIAL POSITION: The “wounded” and the learner lie. The time spent on the exposure of the wound is not taken into account (bandaging over the uniform is allowed). Dressing material and other first aid equipment (harnesses, tires) are in the hands of the learner or near him.
By command:
the trainee detects the wound and proceeds to apply the dressing.
The time is counted from the beginning of the dressing deployment until the bandage is secured (with a pin or the ends of a torn bandage tape).
Name |
||||
|
Primary dressing on the right (left) eye |
|
|||
Estimated by time: |
||||
Satisfactorily |
||||
Servicemen |
||||
Errors that reduce the assessment: |
||||
By one point |
||||
|
Primary dressing on the right (left) ear |
|
|||
Estimated by time: |
||||
Satisfactorily |
||||
Errors that reduce the assessment: |
||||
By one point |
|
|||
|
Primary dressing on the elbow (knee) joint |
Turtle dressing on the elbow area.
|
||||
|
|
||||
Turtle dressing on the knee area. |
|||||
Converging turtle dressing.
|
Divergent turtle dressing.
|
||||
Estimated by time: |
|||||
Satisfactorily |
|||||
Errors that reduce the assessment: |
|||||
By one point |
|
||||
|
Primary shoulder bandage |
Bandage the bandage from left to right on the left shoulder joint, from right to left on the right joint, i.e. the bandaging of the spike bandage is carried out in the direction of the damage side. Distinguish ascending and descending spike-like dressings on the shoulder joint area. |
||||
Rising spike-like dressing.
|
Descending spike bandage.
|
||||
Estimated by time: |
|||||
Satisfactorily |
|||||
Errors that reduce the assessment: |
|||||
By one point |
|
||||
|
"Eight-shaped" bandage on the chest (applied in one package and a bandage) |
|
|||
Estimated by time: |
||||
Satisfactorily |
||||
Errors that reduce the assessment: |
||||
By one point |
the bandage is applied weakly (slips), or when it is applied, “pockets”, folds are formed; |
|||
|
Primary dressing on the ankle joint |
|
|||
Estimated by time: |
||||
Satisfactorily |
||||
Errors that reduce the assessment: |
||||
By one point |
|
|||
7. Fractures, bruises and sprains: the concept, signs, general rules of first aid
7.1. Fractures: concept, signs, general rules of first aid
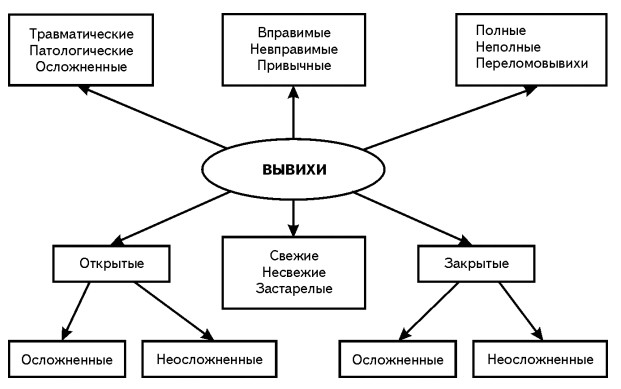
Types of fractures. Fractures are closed, in which the integrity of the skin is not broken, there is no wound, and open, when the fracture is accompanied by injury of the soft tissues.
According to the degree of damage, a fracture is complete, in which the bone is fractured completely, and incomplete, when there is only a fracture of the bone or a crack. Complete fractures are divided into fractures with displacement and without displacement of bone fragments.
In the direction of the fracture line relative to the long axis of the bone, there are (Fig. 62) transverse (a), oblique (b) and helical (c) fractures. If the force that caused the fracture was directed along the bone, then its fragments can be pressed into one another. Such fractures are called impacted.
When injuries are caused by bullets and fragments flying at high speed and possessing high energy, many bone fragments form at the fracture site — a comminuted fracture is obtained (e).
Signs of bone fractures. With the most common fractures of the limb bones, severe swelling, bruising, sometimes limb flexion outside the joint, and shortening of the limb appear in the area of injury. In the event of an open fracture from the wound, bone ends may protrude. The injury site is sharply painful. You can determine the abnormal mobility of the limb outside the joint, which is sometimes accompanied by a crunch from the friction of bone fragments. Specially bending the limb to make sure there is a fracture is unacceptable - this can lead to dangerous complications. In some cases, bone fractures do not reveal all of these signs, but most are characterized by sharp pain and marked difficulty in movement.
A rib fracture can be assumed when, due to a bruise or compression of the chest, the victim notes severe pain with deep breathing, as well as feeling the place of a possible fracture. In case of damage to the pleura or lung, bleeding occurs or air enters the chest cavity. This is accompanied by respiratory and circulatory disorders.
In the case of a spinal fracture, severe back pain, paresis and muscle paralysis appear below the fracture site. Involuntary discharge of urine and feces may occur due to impaired spinal cord function.
When the pelvic bones break, the victim cannot stand up and lift his legs or turn around. These fractures are often combined with damage to the intestine and bladder.
Fractures of the bones are dangerous by damage to the blood vessels and nerves located near them, which is accompanied by bleeding, sensitivity disorder and movements, and the damaged area.
Severe pain and bleeding can cause the development of shock, especially in case of untimely immobilization of the fracture. Fragments of the bone can also damage the skin, as a result of which a closed fracture turns into an open one, which is dangerous by microbial contamination. Movement at the fracture site may result in severe complicationstherefore it is necessary to immobilize the damaged area as soon as possible.
General rules for first aid for bone fractures.
To inspect the fracture site and apply a bandage on the wound (in the case of an open fracture), clothes and shoes are not removed, but cut. The first stop bleeding and impose an aseptic bandage. Then the affected area is given a comfortable position and an immobilizing bandage is applied.
An anesthetic agent is injected under the skin or intramuscularly from a syringe tube.
For immobilization of fractures, standard tires are used, which are contained in kit B-2, or available tools.
7.2. Bruises: concept, signs, general rules of first aid
Bruises occur when a strong blow with blunt objects, with collapses, the impact of a shock wave.
When bruised damaged soft tissue with a rupture of blood vessels and hemorrhage, but the integrity of the skin remains. At the same time, hemorrhages are formed during the blood-soaking of tissues, blood tumors (hematomas) during the accumulation of blood in the tissues in large quantities.
When bruises observed pain, swelling, impaired function, hemorrhage in the tissue. Particularly worried about the pain immediately after the injury. To detect swelling, sometimes a comparison of the symmetric areas of the damaged and intact side, for example, of both hands, is required.
Hemorrhage is visible only in cases where it is located under the skin. When hemorrhaging in the deep-lying tissues, the color of the skin at the injury site does not immediately change.
Significant hemorrhage can lead to fever. With the suppuration of the outflowing blood, the pain and swelling in the area of the bruise increase, there is a local and general increase in body temperature.
In the case of a strong blow to the chest and stomach, ruptures of the internal organs can occur, accompanied by the occurrence of internal bleeding and the development of traumatic shock.
Strong blows to the head lead to concussion and brain injury. Concussion of the brain is accompanied by dysfunction of brain cells, multiple small hemorrhages in the substance of the brain. When a brain contusion occurs, brain tissue is ruptured and significant cerebral hemorrhage occurs, resulting in the death of entire groups of nerve cells.
Under the action of a shock wave of an explosion, a contusion occurs on a significant surface of the human body. It can also be observed during an underwater explosion from the impact of a shock wave that propagates through the water.
Contusions are also usually accompanied by concussion or contusion of the brain.
With mild contusion, there is a short-term loss of consciousness, a slight decrease in pulse rate, slow shallow breathing with separate deep breaths, and a tendency to vomit. These symptoms usually pass quickly, but the shell-shocked person is not well versed in the environment, is weakened, and may not remember the circumstances of the injury, he has dizziness and hearing loss.
In severe contusion, there is a loss of consciousness for a long time, the face of the victim is pale, the pupils are dilated, react poorly to light or do not react at all. The pulse decreases to 50–60 beats per minute, the muscles relax. Vomiting and involuntary discharge of urine and feces are often observed.
After the return of consciousness, the victims are dizzy, impaired speech, hearing loss, etc. Brain contusion is often combined with damage to various internal organs.
First aid should help reduce pain and hemorrhage in the tissue. Immediately after the injury, a cold and pressure bandage is used. A cold lotion is applied to the bruised area or a bandage with an ice pack, a hot-water bottle with cold water, and pieces of ice are placed on the bandage.
When abrasions lotion is not necessary. The abrasion is smeared with tincture of iodine, a sterile pressure bandage is applied to the bruised place, and cold is applied to the bandage. The bruised part of the body must be kept calm and elevated.
To speed up the resorption of hemorrhage, after 2-3 days after the injury, heat is prescribed in the form of a warming compress, bath, sollux, and massage. With earlier use, these procedures are dangerous with an increase in hemorrhage.
7.3. Dislocations: concept, signs, general rules of first aid
Dislocation is called the displacement of the articular ends of the bones. Often this is accompanied by rupture of the joint capsule. Dislocations are often noted in the shoulder joint, in the joints of the lower jaw, fingers. With dislocation, there are three main signs: complete impossibility of movement in the injured joint, severe pain; the forced position of the limb due to muscle contraction (for example, when the shoulder is dislocated, the victim keeps his arm bent at the elbow and taken away to the side); a change in the configuration of the joint in comparison with the joint on the healthy side.
In the area of the joint is often marked swelling due to hemorrhage. It is impossible to probe the articular head in the usual place, in its place the articular cavity is determined.
First aid is to fix the limb in the position most convenient for the victims, using a splint or bandage. The doctor must dislocate. Dislocation in one or another joint may be periodically repeated (habitual dislocation).
8. Training on the implementation of standards for stopping bleeding and applying immobilizing dressings for bone fractures No. 3, 4, 5
Standard number 3 - The imposition of a rubber hemostat on the thigh (shoulder)
INITIAL POSITION: The student lies near the "wounded", holds a harness in his hands.
By command: "To comply with the standard - Proceed"
trainee imposes a tourniquet.
Compliance with the standard ends fixing the harness.
Name |
Conditions (order) of performance of the standard |
|||
The imposition of a rubber hemostat on the thigh (shoulder) |
|
|||
Estimated by time: |
||||
Satisfactorily |
||||
Servicemen |
||||
Errors that reduce the assessment: |
||||
By one point |
|
|||
Before |
|
|||
Standard number 4 - Overlay twist with a scarf and other available tools on the thigh (shoulder)
INITIAL POSITION: The student lies near the "wounded", holds a spin in his hands.
By command: "To comply with the standard - Proceed"
the learner imposes a twist.
Compliance with the standard ends fastening twist.
Name |
Conditions (order) of performance of the standard |
|||
Overlay twist with a scarf and other available tools on the thigh (shoulder) |
mark the time of spinning on a piece of paper and put it under the twist. |
|||
Estimated by time: |
||||
Satisfactorily |
||||
Servicemen |
||||
Errors that reduce the assessment: |
||||
By one point |
1. imposed spin on the area that does not correspond to the wound; |
|||
Before |
1. improper imposition of a twist (relaxation or slipping), which causes re-bleeding that threatens the life of the wounded. |
|||
Standard No. 5 - Overlay of tires made of scrap material for fractures of the bones of the upper and lower limbs
INITIAL POSITION: when a tire is applied to the shoulder (lower leg), the “wounded” sits (lies) on the ground, and the learner works in a comfortable position. The tire is superimposed on the uniform (tire fitting time is not included in the standard). Pre-dressing is not required. Dressings, tires are next to the student.
By command: "To comply with the standard - Proceed"
trainee imposes a tire.
Performing actions in case of fracture of the bones of the shoulder ends with the suspension of a hand on a kerchief (bandage, belt); in case of fracture of the bones of the leg, fastening the dressing (with a pin or the ends of a torn bandage tape).
Name |
Conditions (order) of performance of the standard |
|||
|
Tire overlay made from scrap material for fractures of the shoulder bones |
|
|||
Estimated by time: |
||||
Satisfactorily |
||||
Servicemen |
||||
Errors that reduce the assessment: |
||||
By one point |
|
|||
Unsatisfactory |
|
|||
|
Overlaying tires made of scrap material for fractures of the leg bones |
|
|||
Estimated by time: |
||||
Satisfactorily |
||||
Servicemen |
Damask signs of various targets, their detection Procedure on contaminated areas Ways to overcome areas (zones) of infection Special processing equipment and sanitary treatment of personnel Procedure for using personal protective equipment, protective properties of standard equipment, terrain, facilities to protect personnel | |||
First aid for injuries is an urgent action that is required for unpleasant incidents or various injuries. These actions are determined by the main goal of the emergency health program, aimed at eliminating the factors that threaten the life and health of the injured, avoiding undesirable complications, reducing pain and helping the injured person before the arrival of ambulance doctors. All these actions are quite simple, and everyone can easily perform them, without special education and training.
In many cases, timely provision of first aid for injuries can save a person’s life or save him from undesirable consequences and complications. Therefore, it is very important that each person knows exactly how to behave in a given situation, and what actions to take.
Injury is a malfunction of an organ due to damage by external factors. These types of injuries differ:
- Mechanical injuries are most common. They are divided into open (when the skin breaks when the injury occurs and as a result bleeding occurs) and closed (without breaking the skin).
- Physical injuries occur when different temperatures affect the body (burns, frostbite), as well as when the body comes into contact with an open source of electrical current.
- Chemical injuries occur when accidental unwanted contact of chemicals with human skin.
- Mental injury is a negative consequence of the action of irritants on the human body. Most often they are the result of a strong fear or some kind of stressful situation.

Wounds
A wound is a type of trauma in which the skin or mucous membranes of the human body are torn.
First health care for injuries and injuries should be due to the speedy arrest of blood. The most correct way to stop arterial bleeding is to apply a tourniquet. If it was not at hand, you can use any things that are suitable for this purpose - a belt or tie. The harness should be applied only on the arms or legs, but strictly above the injury site. In order not to damage the skin under the tourniquet enclose any soft cloth or napkin. In order to avoid skin necrosis, the harness can be applied only for a period of not more than 2 hours, but every 30 minutes it should be slightly loosened and then re-tightened. You also need to fix the time of application of the harness.

Slight bleeding with minor wounds can be stopped with a tight bandage. The edges of the wound need to be treated with iodine, put on the wound several layers of sterile bandage and tightly bandaged. It will also be better if you manage to slightly raise the injured place.
If medium or large blood vessels are injured, the blood can be temporarily stopped by pressing the damaged area with a finger. If happened arterial bleeding, then you need to press the place above the wound, and if the venous - below.
If the blood has gone from the nose, it can be stopped by the introduction of a gauze or cotton swab moistened with hydrogen peroxide into the nose.
Bruises
A bruise is a type of injury in which the soft tissues and vessels of the body are damaged, and as a result, bruising occurs. The most common cause of injury is a bounce or collision with a blunt object.
The main signs of bruises include:
- The sharp pain that occurs at the moment of the injury itself and does not subside for some time;
- Edema usually occurs several hours later or even the morning after an unpleasant incident;
- A bruise may appear a couple of hours after receiving this injury, or it may appear only a few days later if the body’s deformed deep tissues.
Rendering emergency room for injuries of this nature consists of the following stages:
- Applying a bandage on the injured place;
- Raising the affected area slightly above body level;
- Applying a cold compress to the injured injury site (ice pack, towel soaked in cold water).
However, with abundant internal bleeding does not stand on for a long time to apply cold due to the possible death of skin cells, and ensuring complete rest to the injured area will help reduce pain.
In case of complex injuries of the head, chest or abdominal cavity, it is imperative that you call a doctor and, prior to his arrival, guarantee the injured person complete rest and immobilization.
Dislocation
Dislocation is damage to the articular sac and illogical movement of the bones that enter these joints. Such injuries can occur with a strong blow, a bad turn.
The main signs of dislocation include:
- Sharp and painless for several hours;
- Disruption of the normal functioning of the injured arm or leg;
- Atypical posture sprained legs.
Emergency care for injuries associated with sprains requires special care, since its purpose is not only to reduce the pain of the victim and prevent the development of edema, but not to aggravate the already difficult situation. First of all, you need to fix the damaged part of the body - the arm can be hung or just loosely attached to the body, but the leg cannot be moved and moved, it can be simply wrapped with a soft cloth. The victim must be urgently taken to a medical facility. At the same time, transportation of an injured person with a dislocation of the arm is possible in any position, but with an injured leg - only in the supine position with a tightly fixed leg.
Fractures
Fracture is a violation of the integrity of the bones of the human skeleton by force. There are closed (without injuring the layers of the skin) and open fractures (with destruction of the epidermis).
The main signs of bone fractures are:
- Pain in a broken limb, which may increase with movement;
- Impaired functioning of the injured limb;
- The wrong shape of the injured limb (curvature or reduction in size);
- The instability of bone fragments in the wound.

First aid in case of damage to the skeleton is necessary to reduce the level of pain, fixing parts of the broken bone and the impossibility of breaking muscles with sharp fragments. The first stage of care is considered to be the application of a fixation splint to the injured limb, including the joints located above and below the injured area. Only two joints need to be fixed, except for injuries of the shoulder or hip, when several joints are fixed.
PPM for open fractures is performed to protect the wound from unwanted infection. For such injuries, it is necessary to treat the skin around the wound. antiseptic and attach a sterile napkin, and only then impose a tire. The limb is attached to the tire exactly as it became due to injury. A patient who received this type of injury should be immediately taken to a medical facility.
To reduce the pain of the injured person, the injured arm is pulled to the chest, and the foot is placed on a pillow or any other elevation.
Immobilization of the injured limb is carried out with the help of specialized medical tires or those items that are at hand - a board, a ski, a straight stick.
If such items are not at hand, then for convenience and safety of transportation, you can simply tie a broken arm to the ore cage, and the injured leg to a healthy one.
Rib fracture
Fracture of the ribs most often occurs with a strong blow or intense squeezing of these bones. The most frequently marked fractures of the ribs from the fifth to the eighth.
- The feeling of pain when you take a deep breath, when you press on the injured place;
- Prolonged bouts of prolonged cough;
- Unusual posture of the injured body;
- Tension of some chest muscles.
First aid for mechanical injuries This type of render to minimize the motor activity of the chest. To do this, you must very tightly wrap the chest and position the patient in a sitting or half sitting position. If the injured feels severe pain, a pain reliever can be taken.
Spinal fracture
Spinal fracture is the most dangerous and serious injury. musculoskeletal systemwhich can cause vertebral dislocation and spinal cord disorder.
- Stabbing pain in the back, which becomes more severe with movement;
- The protrusion of the injured vertebra above the surface of the back;
- Desensitization of the legs, and in some cases paralysis;
- Violation of the basic functions of the pelvis;
- The shock of the patient.
First aid for injuries of the musculoskeletal system has the main purpose of moving the patient to the hospital. In this case, the injured can lie only on his back, on a hard surface, not moving and not turning over. If the victim feels pain in the neck, then the head and neck should be fixed with pillows or blankets. It is advisable to wrap the patient warmer. To prevent unwanted movement or movement of the patient, it can be wound to a stretcher.
Traumatic brain injury
Craniocerebral injuries consider concussion or a violation of the integrity of the skull. A concussion is a very serious injury that often happens when you hit the head with a blunt object and as a result of a brain contusion.
Main signs of concussion:
- Headache;
- Extraneous noise in the ears;
- Dizziness;
- Nausea, vomiting;
- Pale skin;
- Lethargy and drowsiness;
- Loss of consciousness during injury;
- Short term memory loss.

To assist with concussion, it is necessary to give the injured prone position and apply a cold compress to his head. Then the victim is required to be delivered to the hospital.
Fracture of the bones of the skull
Fracture of the bones of the skull is considered one of the most dangerous injuries to a person’s life, because as a result of such a wound, the brain cavity opens, and various unwanted infections can enter it.
The main symptoms of this type of injury:
- Excretion of fluid from the ears and nose;
- Hearing impairment;
- The appearance of bruises under the eyes (after some time).
In order to properly provide PPM in violation of the integrity of the patient's skull must be laid on its side so that the blood does not get airways. A sterile bandage should be applied to the open wound and the victim's head should be fixed. It is not allowed to wash the wound. The injured need to be transported to the hospital as quickly and safely as possible.

Traumatic shock
Traumatic shock is the way the body reacts to an external situation when it occurs. different kinds injuries. Characteristic signs of traumatic shock are the extinction of the functions of the central nervous system, inconsistency of all processes of human life, lowering blood pressure and increased respiration.
Traumatic shock occurs in two phases:
- Phase excitation. In this phase, there is clarity of consciousness and excitement in movements and speech behavior.
- Phase braking. At this phase, the victim is in a clear mind, but he is absolutely indifferent to everything that happens. The patient's face turns pale and his eyes sink, he becomes covered with cold sweat, his pulse quickens and weakens, his blood pressure and body temperature decrease.
First aid to the victim in the presence of traumatic shock should be rendered very carefully and carefully. After carrying out all the necessary medical procedures for bandaging and fixing the injured places of the victim, it is necessary to wrap up with a warm blanket and, if possible, drink hot tea or coffee.


Popular
- Why seals may appear
- Blood disorders in children
- What can not drink a pill
- Blood disorders in children
- Blood disorders in children
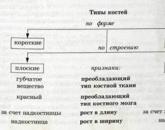
- Bones: structure, composition, types of bones, types of compounds and their characteristics
- How many live with lung cancer
- Influenza in children: how to treat, what can and cannot be done to parents, what medicines will help?
- "They are people too ..." - you say
- What helps "Prednisolone"